
SiteGround hosting is one of the best hosting services you can go with. However, the inode usage limit can be quite frustrating, right? You might simply be developing or upgrading your website and you will suddenly get an email from SiteGround support saying that you are exhausting the inode usage limit.
This is quite frustrating, isn’t it? Don’t worry, this guide is especially for you. We will cover everything you need to know about the SiteGround inode usage limit and what are steps you can take to reduce the inode usage.
What are Inodes in SiteGround?
Every file or folder that you store in your web server will have some metadata. That is the information of a file/folder. The metadata that stores the information about the file, folder, email, image, etc is called an inode.
Now, to limit the over usage of the server, each hosting company has some limits in the inode. Talking about SiteGround, there is an inodes limit that ranges from 200k to 600k for shared hosting.
It depends on the plan you choose. To begin with, the first plan has a limit of 200k whereas the second and third plans have a limit of 400k and 600k respectively.

To see the inodes details by yourself, you can see the description of the “Server resources” as we have shown in the image.
So, what if you exceed the limit? Well, in that case, it might affect your service and the users might also face errors when they open your website. So, it’s always better to maintain the inode usage limits.
Let’s learn more about how you can check the inodes in your account.
How do I check my Siteground inodes?
There is a limit which you will have to maintain. So, the next question is how you can check your inode usage.
SiteGround provides you with detailed stats on inode usage. There is not just one but multiple ways to check the inode usage. Here are a few ways you can check it out.
The first one is by heading over to Services > Hosting and then you will have to click on the “Manage” button shown under your hosting plan.

Now, you will have to click on “Statistics” where you will find a whole new section for inodes. You can check the limit as well as usage from there.
At first, you will see the inodes limit. If you see on the right side, you will also see the current usage. You can refer to the below image for more.

Well, this is not the only way using which you can check the limits. You can also see the same thing in “Site Information”.

You will have to make sure that you don’t exceed the limits that are given to you.
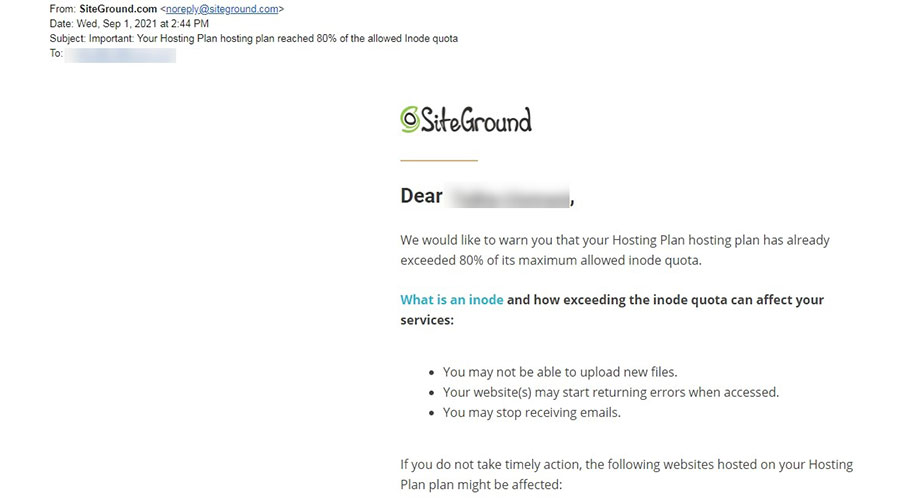
But what if you reach the limit and you don’t even know about it? There is nothing to worry about here. SiteGround is kind enough to send an email whenever you cross the 80% inode usage limit.
You will get an email that tells you that you might soon exhaust your inode limit.
This is when you can take some sincere steps to decrease your inode usage and regain your normal stage.
Wondering how to do it? The next section is for you.
How do you reduce inodes in SiteGround? (8 STEPS)
We will now see how you can reduce the inode count in SiteGround. Before making changes, you can take a quick backup. Save the backup in a zip file so that it won’t use more inodes. Thereafter, you can start the cleaning process in SiteGround.
Step 1. Remove unused themes and Plugins
The first step is pretty simple. You can simply head over to wp-content in file manager and then head over to Themes and delete all the themes that you are not using. You can do the same thing for plugins. All the plugins are found in the “Plugins” folder in wp-content.
Please note that you can’t simply deactivate the plugins. You need to “delete” them. Deactivating the plugins won’t free up any inodes. So, make sure that you are deleting the themes and plugins.
Step 2. Delete any custom folders
Many people have a habit of keeping custom folders in the file manager. If you are doing so, you can simply delete them or move them to free cloud storage like Google Drive or Dropbox. If you think you might need it in the future, you can simply make it a zip file and save it.
Please note that when you extract the zip file, it will again increase the inodes. Therefore, it’s always better to store it at other places instead of storing it in the hosting.
Step 3. Media Cleaner
Media cleaner is a great plugin you can use to delete all unused images. Many times, we upload the images on our WordPress portal but we don’t use them in the post. Now, images are still there in your hosting server, right? Therefore, you can delete such images.
It might take a lot of time to delete such images. So, there is an easy way to do so. You can use Media Cleaner. It’s a plugin that will automatically detect and clean all the unused images. You can configure it as per your requirements.
 It works pretty well. You just need to select the options and then run them.
It’s also advised that you stop WordPress from creating multiple images. WordPress will create a new image of a different resolution for each image you upload. For instance, when you upload a photo, it will create many images sizes such as thumbnail images, medium-sized images, small-sized images, etc. You can stop WordPress from doing it.
Just head over to Settings > Media and change all the dimensions to 0.

This is how you can stop WordPress from creating new images for every image you upload. Not to mention, it will decrease a lot of inodes. You can also stop WordPress from creating folders for every year/month. There will be a small checkmark on the same page. You can simply uncheck it and that’s it.
Step 4. Delete Old Backups
Backups are extremely important but you can surely delete the old backups that you don’t need. If you are using a good plugin, it will automatically replace the backups. However, sometimes, due to the wrong configuration, you might have a lot of backups. You can simply delete them.
Alternately, you can also use plugins like Updraft-Plus to save the backup in cloud storage. If you have the backups, you can compress them into a zip file.
Step 5. Clean your Emails
If you are reading this guide carefully, we mentioned that even emails will use inodes. So, you can clean up your emails. So, to decrease SiteGround inode usage, you can clean up your emails.
Here you can head over to inbox, send emails, drafts, and even spam folders to ensure that everything is cleaned. If you have subscribed to a lot of newsletters from your domain email, it’s time to unsubscribe them.
Step 6 – Clean up your Cache and Extra Files
We will then clean up cache files. If you are using any plugins, you can clean the cache of that plugin. You will have to head over to the WordPress panel to do so.
In the same way, you can remove all other unnecessary files. Some caching plugins might create files and folders that you don’t need. This is usually outside your home directory. You can clean it up using SSH.
Step 7. Manual Deletion
SiteGround does a wonderful job of stating how many inodes each folder is using.

So, if you are having multiple folders, you can see how many inodes each folder has. Now, if there are any custom folder that has a more number of inodes, you can clean those inodes.
For instance, you can head over to wp-content and plugins. Now, if any plugin is using inodes and you don’t necessarily need that plugin, you can consider replacing it or deleting it. Of course, the same process goes for the uploads folder where you will find the media files.
Don’t delete any files that you are not aware of. That might be a system file that might cause problems in the future.
Step 8. Ask Support to Remove Unnecessary Files
SiteGround is known for its support. You can surely contact the support team and ask them to remove all the unnecessary files that are stored on your server.
Here are a few things that you can mention.
- Temporary folders.
- Log folders.
- OpCache files.
For the people who don’t know, temporary files are usually created by default. You don’t need them. In the same way, log files store the log of what you are doing in the hosting panel.
Lastly, Opcache is the caching solution given to you by SiteGround. It uses a lot of inodes as cache files can be a lot more than you think especially if you were developing the website. So, once you are done with the development process, you can ask them to delete the cache files.
Best alternatives to SiteGround inode limitation
The above-given methods are great only if you have limited inode usage. However, if your SiteGround inode usage is due to your important files that you can’t delete, you might want to try another alternative. Don’t worry, we will give you a few best alternatives to SiteGround inode limitations.
Upgrade the Hosting
It’s pretty obvious but you can surely try upgrading the plan. As we have mentioned before, the first plan only has a limit of 200k. However, the next two plans have a higher inode limit of 400k and 600k respectively. So, you can surely go with these plans if you want.
Now, if you think 600k inodes are also not enough for you, their cloud plan will be a perfect choice for you. They offer seamlessly easy migration to the cloud. Of course, cloud service will cost you a lot more than shared hosting. The cloud hosting has unlimited inodes.

There is also another way you can upgrade the hosting. You can buy another plan with the same hosting. Let’s assume, you are on the GrowBig plan of shared hosting where you can host unlimited websites.
Now, if the inodes limits are reached here, you can buy the same hosting plan from the same account and host a few of the websites there. Of course, you will have to pay double the price (for two plans) but it’s affordable as compared to cloud hosting.
The above method only works if you have inodes scattered over different websites. For instance, if you have 10 websites hosted and the inodes are over 50k for each website.
You can buy the same plan again and host 5 websites over there. It will decrease the inodes usage and you will get perfect hosting. This won’t work if you have a single website taking most of the inodes. In that case, you will have to upgrade.
Well, if you don’t want to upgrade, we have another best solution that you will surely love. Even if you are planning to upgrade, this might amaze you.
Go with a better hosting
Without a doubt, SiteGround is a great hosting you can use. However, few limits come with it. SiteGround inode usage limit is the biggest drawback here. Therefore, you can go with the hosting that doesn’t keep a count of inodes or give unlimited inodes.

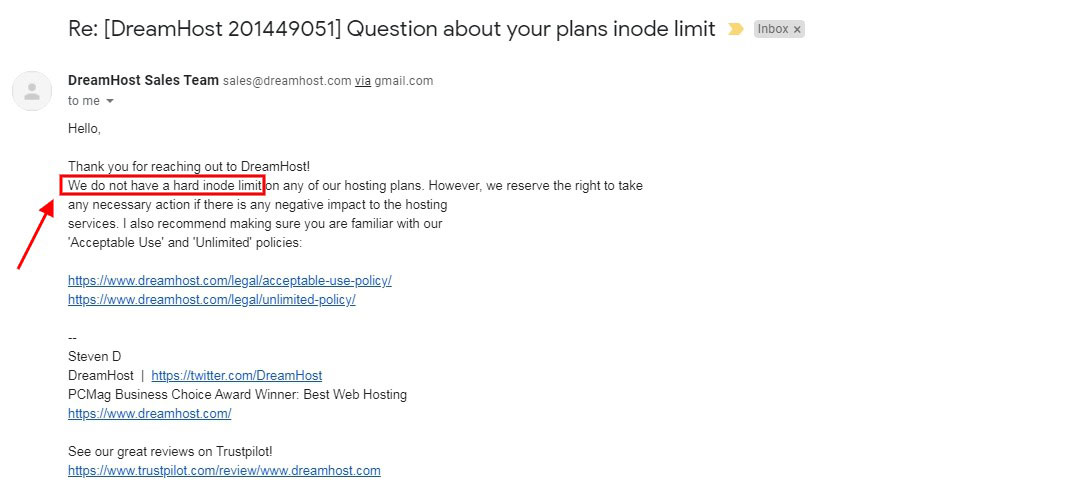
DreamHost is the best hosting here that doesn’t keep track of inode usage.
In simpler words, you will get unlimited inodes in Dreamhost. Does this mean you can have as many files as you want? Yes. However, they have a fair files policy. You can’t simply use Dreamhost as your storage service. However, if you have a lot of files on your website, Dreamhost won’t put any hard limit on the inodes.
Now, if you are running a decently profitable business, you can surely use enterprise-level hosting. Kinsta is the best Enterprise managed WordPress hosting. It will cost you more but the performance is unmatchable.
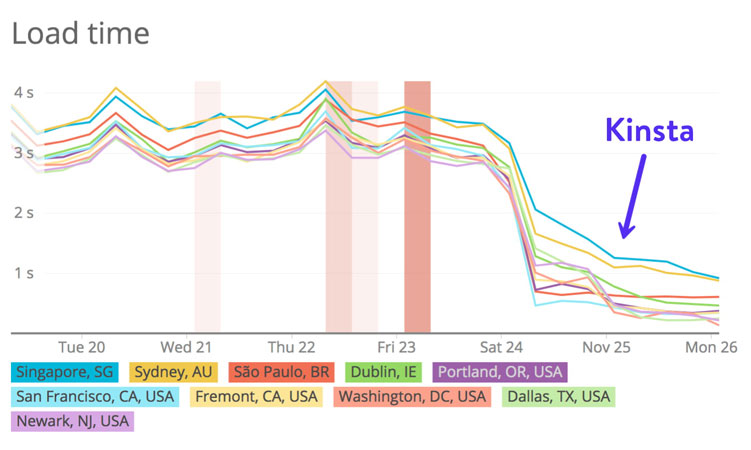
You will get excellent performance and there are more resources available here. Also, the team will manage the hosting for you. Therefore, you don’t need to worry about technical things.
Conclusion
You don’t need to stress a lot about inodes. You can monitor the inodes usage once in a while and reduce it by following the given steps. If you find yourself reaching the limit too often, you can migrate to a better hosting such as Dreamhost or WPengine.

Opting with one of these hosts will take the stress out of you, as you don’t need to worry about the inodes there. In this way, you can focus on scaling up your business instead of worrying about the inodes.