Do you know what’s one of the coolest things about HostGator? They give you a free SSL certificate for all your websites. If your website is hosted on HostGator, you can have the HostGator free SSL installed on your website.
This article is all about HostGator Free SSL. We will cover the overview of what is SSL and why it is free. Further, we will talk about the importance of SSL and we will see the exact steps to install the HostGator SSL certificate on your website for free.
What is SSL?
Before we get into the actual topic, let’s learn about the SSL certificate in short. SSL stands for Secure Socket Layer. It is a security certificate used to increase the security of the website. In simpler words, your website will start with HTTPS instead of HTTP. This will enable the security of your website. To get the extra S, you will need an SSL certificate.
Types of SSL Certificates
If you have visited the HostGator website before, you might have noticed that there are various types of SSL. This offers a different level of security.
You will also find a free SSL option in HostGator. This is very confusing for some people as they can also see the paid SSL as well as they can see the free SSL option.
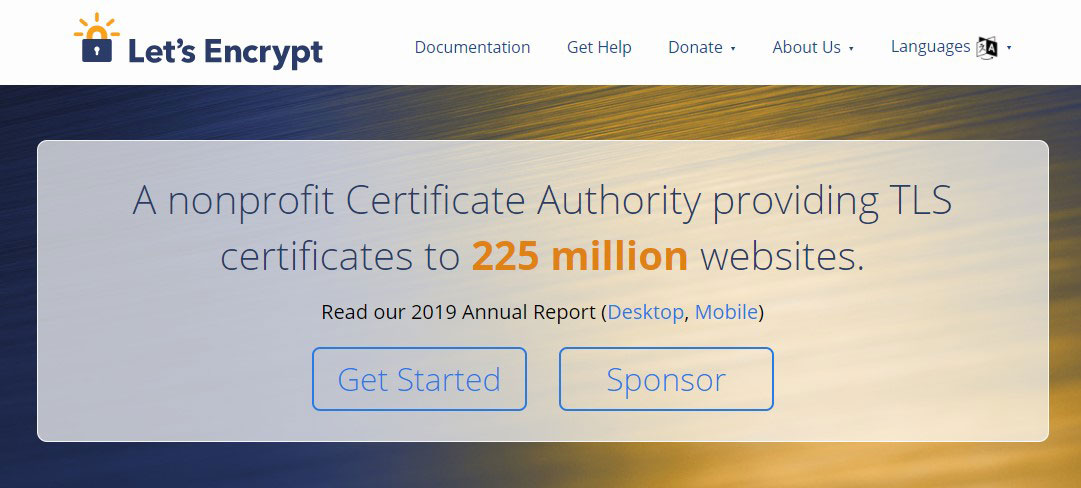
Well, the free SSL is given by Let’s Encrypt. It is a non-profit authority that has already provided more than 225 million certificates so far. You can use the free SSL on your website.
 The process is fully automated if you are using HostGator’s hosting.
Is Free SSL Enough?
You surely might be wondering whether the free SSL certificate is enough for a website or you need a paid one.
Well, for most of the websites, free SSL is more than enough. However, if you run an eCommerce website with many translations, you can consider a premium one.
HostGator has this amazing advantage of free SSL. So, even if you have a personal blog, you should enable the SSL certificate. This will help you in ranking better on Google as well as to increase the security of the website. SSL will help you a lot.
Most importantly, it’s free. So, why not take the advantage of it?
The Importance of SSL
SSL is important because of many reasons. We have already given an overview of how SSL is useful. So, half of you might already have an idea about the importance of SSL. Here is the complete breakdown of the benefits.
- To begin with, the first reason is the improved security of the website. With SSL, the security of the website will increase and you will not have to worry about security.
- The next reason is performance.
- When you have SSL, Google and all the other search engines will prioritize your website. In simpler words, your website will rank better than other websites.
- It gives a clear green light (lock) to the visitors saying the website is safe
- Most importantly, it is free.
- In the future, Google Chrome might even block the website that doesn’t have SSL.
How to Install SSL Certificate in HostGator?
To install free SSL in HostGator hosting, you don’t have to go through a lot of steps. Instead, it is an automated process.
At first, you will have to point your domain name at HostGator hosting. This only applies to the new domain. If you already have pointed the domain at HostGator and are using the hosting account. You don’t need to do anything.
You can simply check out the SSL panel and it will show you that the SSL is enabled and is active.
Here are the steps to check it.
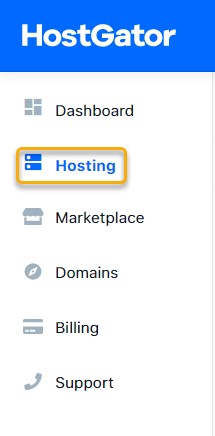
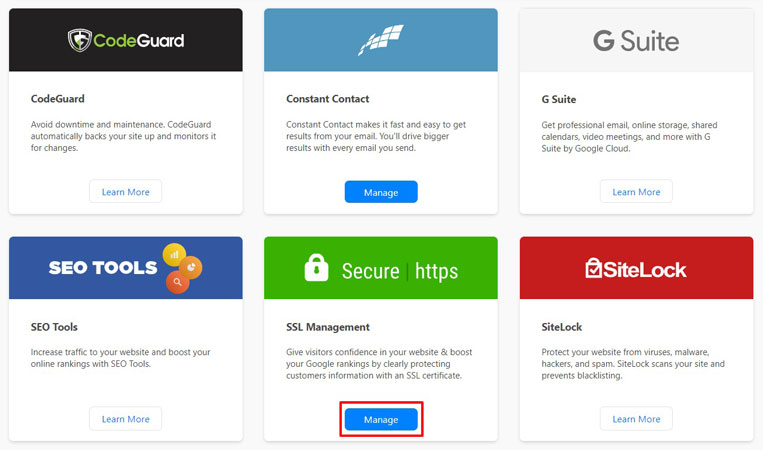
You will first have to head over to the Hosting panel. You can go to the HostGator dashboard and then hit the hosting button from there.
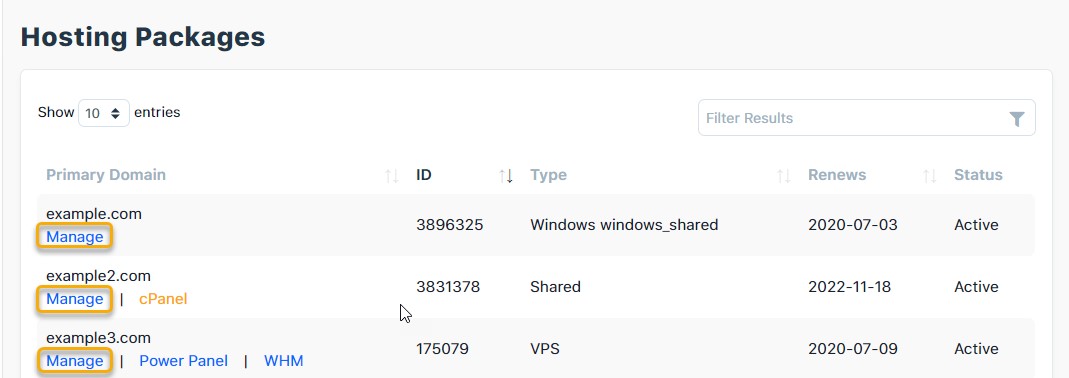
 Once you are there, you will see the complete list of the hosting packages you have. You need to click on the Manage button on whichever hosting your website is hosted.
 You will see all the extra add-ons there. You will need to look for the SSL add-on. There will be an option called SSL Management. You need to click on the manage button below it.
 This will take you to another page where you can see the list of domain names and whether the SSL certificate is active or not. It will tell you the certificate type and its status. If it says Let’s encrypt certificate and it shows active, it means your SSL is active.
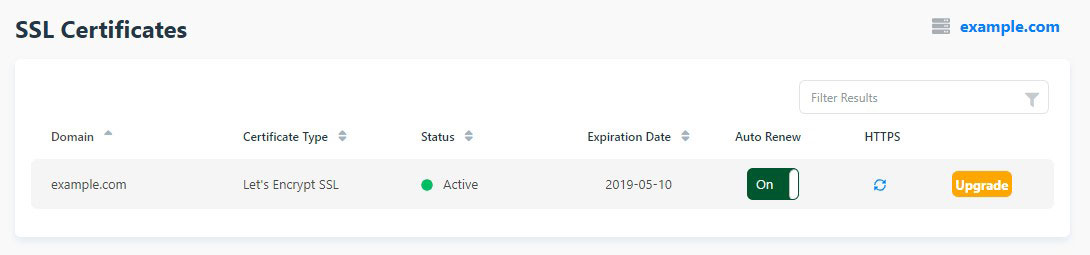 If you have just added a new domain to your cPanel, it will show pending. You don’t have to do anything in such a case. It will take 2 days to complete. Thereafter, it will show active status. If it takes more time, you can surely contact the support.
HTTPS Not Showing on Website
Once you do it, you might still not see HTTPS on your website. That’s common.
This is because we have only activated the SSL and have not yet configured the website to force an HTTPS connection. Even if you write HTTPS in front of your website, it might show an error. Don’t worry, we will see the solution to this too.
For that, you will have to enable HTTPS on your website. Assuming all of you are using WordPress, we will see the method for WordPress. For that, the steps are simple. Like most of the tasks, you will need a plugin for this too.
There are two ways here. One is for the people who are installing WordPress (Fresh installation) and the next is for the people who already have WordPress installed on their hosting.
Fresh Installation
If you are installing WordPress on your HostGator hosting, the steps are quite easy. By following simple steps, you can easily add the SSL in your website.
Just select the protocol as HTTPS when you are installing WordPress. In the installation page (where you enter the URL), you are also asked to enter the protocol. You can select HTTPS from there and continue with the installation.
It is still recommended that you follow the next tasks to make sure that SSL is properly installed on your website.
If you are facing some error after the installation, please continue to get a solution for the same. This article will cover all the things you should know about it.
Activating SSL in WordPress
As we have already mentioned, it is a plugin that will do the work for you. All you need to do is configure that particular plugin and that will do the task. To do it, you will have to first install one of the plugins for SSL.
There are various plugins that you can get here. However, we would suggest you go with Really Simple SSL. This is the easiest plugin that can automatically configure the SSL certificate and enable HTTPS.
Believe us, when we say it “Automatically” does all the work, we mean it.
You will see it in the steps and know how easy it is to install HostGator free SSL in WordPress.
- The first step is to activate the plugin.
- Just go to Plugin > Add New and look for “Really Simple SSL”.
- Install it and activate it.
You are halfway there. Alternatively, you can also upload the SSL plugin by downloading it from the WordPress directory. It is surely your choice.
Once you installed it and activated it, you will an option to activate the SSL. Before you activate the SSL, make sure that you have taken a proper WordPress backup. Sometimes, it might cause some issues. Although the issue is rare it might give problems. So, it is always better to take a backup before you continue.
Thereafter, just click on “Activate SSL” and that’s it.
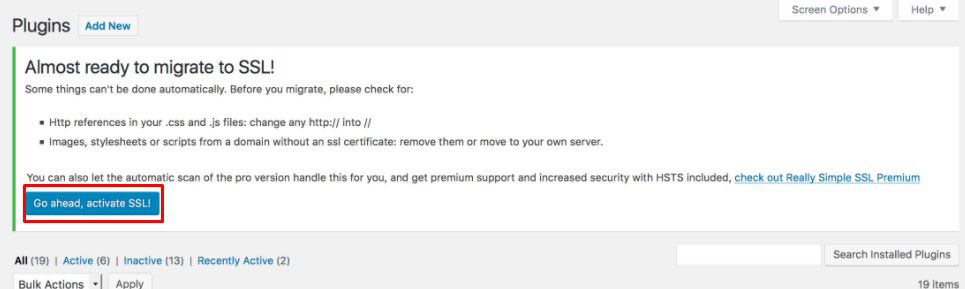 Yes, you have successfully installed the SSL.
Configuring Really Simple SSL
There is no need to configure unless you are facing any issues. If you are facing some issues with your SSL, you can surely change the settings. If not, you can keep the default settings as it is.
The default settings work the best.
You can see the current configuration directly after activating the SSL.
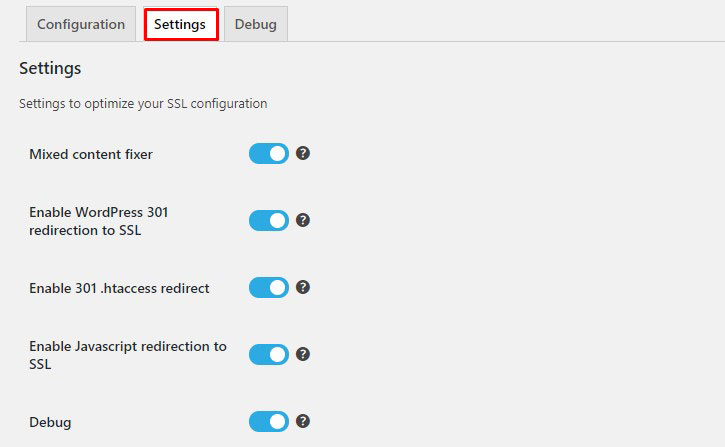
Further, you can also go to Settings > SSL and see the configuration there.
To change the settings, you can see the settings tab, you can just click on the settings tab where you can tweak the options.
 The plugin also allows you to deactivate the plugin and keep the SSL certificate. It might seem like a good idea but you should never do it. This will stop the website from filtering the 301 redirects and mixed content.
If you still want more customization options, you can also go with the pro version. Unless your website has a lot of transactions, you won’t need the pro version. We suggest you invest in premium SSL before going with the pro version of the plugin.
You can also use other plugins to do the same. Most of the plugins come pre-configured. So, you don’t need to make a lot of changes. You can install them and your task will be done.
Insecure Content or Mixed Content Fix
We have already checked out all the information about the HostGator free SSL. Let us dive a little deeper and see the most common error that people face.
This is a common error. Despite activating the plugin, you might see the error that says “Insecure content found” or “Mixed Content found”. Sometimes it also says “Your connection is not fully secure”.
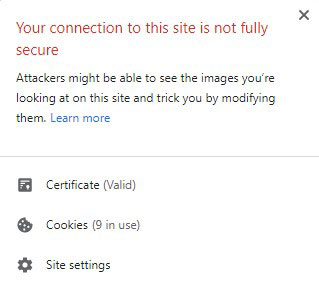 The reason for this error is because of the images and other scripts. The images URL is still using HTTP instead of HTTPS. So, you might see this error. Also, the links that you have embedded might be using HTTP. Therefore, you see this error.
Don’t worry, the solution is easy and fast.
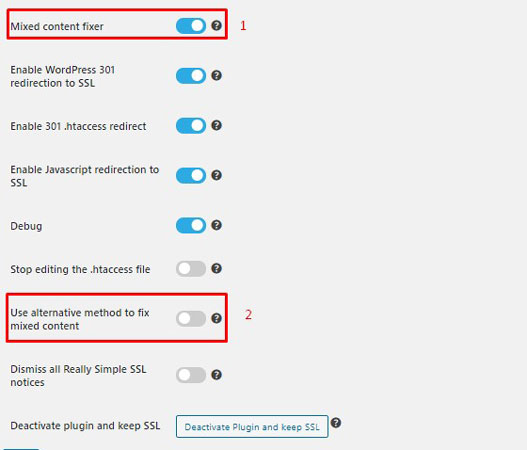
First, you can simply solve it using the same plugin we discussed above. Go to the settings option and you see the first option to enabled Mixed content. Make sure it is enabled (see 1 in image). If it is still not working, you can scroll a little bit and enable the alternative method (see 2 in image). This will do the work and your website will be secured again.
 There is surely another option if this doesn’t work. We will sure another plugin to fix it. The name of the plugin is Insecure Content Fixer. As the name says, it will fix the insecure content.
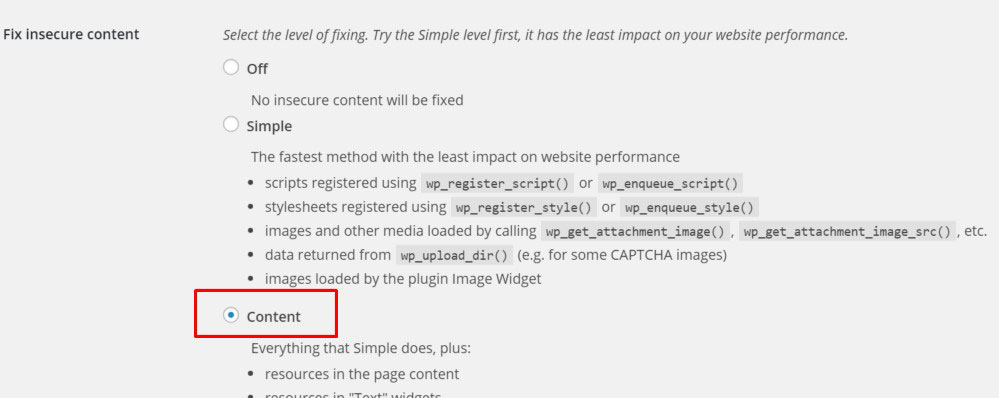
Just like the above plugin, you don’t need to do anything here. By default, simple encryption will be enabled. Change it to “Content”. You can change these settings by going to Settings > Insecure Content Fixer.
 If you see the mixed content error, you can increase it. It might misbehave if you keep the encryption too high. You will all the options in the plugin itself. It is self-explanatory. We suggest you keep the default options and just activate the plugin. It will do the work.
Fixing the Page Builder Errors
In various page builders, SSL might give some issues. For example, if you are using an Elementor builder, you might still see the insecure error. For that, you will need to go to settings and enable the SSL. Most of the page builders have the options in the settings. Head over to settings and you will surely find the option to fix it. Just enable the SSL and you are done.
Final Words
To conclude, this was all about HostGator free SSL. SSL is important and with HostGator, you are getting it for free. It is free for unlimited websites. So, it doesn’t matter how many websites you want SSL, you can use it on all the websites. That’s one extra reason to go with HostGator.
If you have not yet signed up for HostGator and are confused, you should surely Go with HostGator. They provide one of the best services when it comes to hosting. If you already are a customer of HostGator, have you activated SSL? Make sure you activate it and secure your website today itself. You can also keep the auto-renew on (it’s free auto-renew). This will automatically renew the free SSL.
Hello every one there,can you help please I can’t open my website!
I receive that message “erreur liée à la confidensialité”.
Hello Driss,
Have you tried a different browser? Are you getting the same SSL error in different navigators?
There are several reasons for that error. Please try to follow this tutorial to help you solve this issue:
https://kinsta.com/fr/blog/reparer-erreur-connexion-privee-chrome/
Hope that helps!
PS: I sent the link in french, I assumed you speak the language since you received the error in french 🙂