Caching makes your website faster, but you will have to clear them often for a smooth experience. So, here’s how to clear LiteSpeed cache on your website.
This guide covers various methods to clear the cache in different scenarios. The method to clear your cache differs depending on which script/CMS you use.
It will resolve development issues as well as compatibility issues.
Therefore, it’s essential to use the right and easy method for clearing the cache. It will save you time as well as help avoid any conflicts.
Let’s start with, why you need to clear the cache in LiteSpeed?
When and why you might need to clear the cache?
There are many instances when you need to clear your cache.
- First, you must clear the cache if you are developing the site or making changes to your website.
- If you have dynamic content, you can clear the cache to display the latest information (Usually, this is done by default for most CMS).
- You can clear the cache when you have compatibility issues. LiteSpeed also allows you to clear individual cache items.
Now, let’s talk about why you need to clear the cache. The why is pretty much the same in all the cases.
Clearing the cache ensures that users see the latest version of your website with all the recent updates. It clears the old stored memory.
People often don’t clear the cache because they don’t want to have any issues on their website. We will also cover the top issues people face in clearing the LiteSpeed cache and how to solve them.
Before that, let’s check out the methods to clear the LiteSpeed cache.
How to clear Litespeed cache?
You can clear the LiteSpeed cache using various methods. Let’s see all the methods here. It’s recommended to use one of the first five methods. The last 2 methods are advanced methods for developers.
Method 1: Clearing Cache via LiteSpeed Cache Plugin in WordPress
Most people are using the WordPress plugin. If so, it’s super-easy to clear the cache. The plugin offers in-built settings to do it.
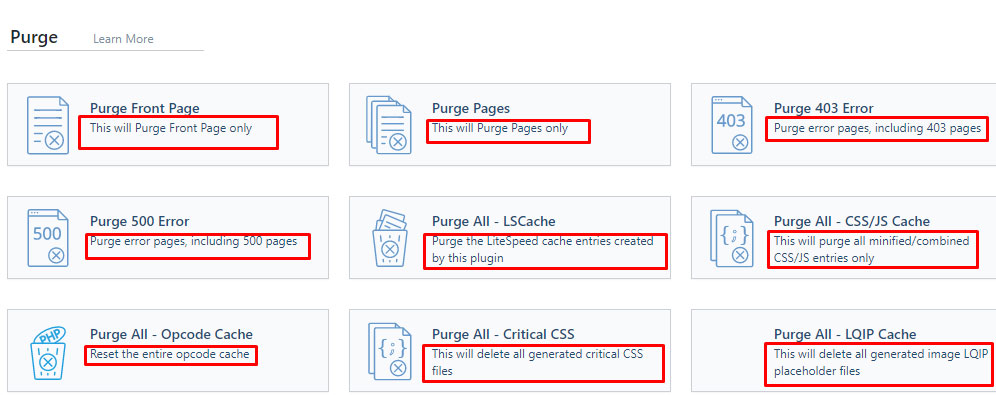
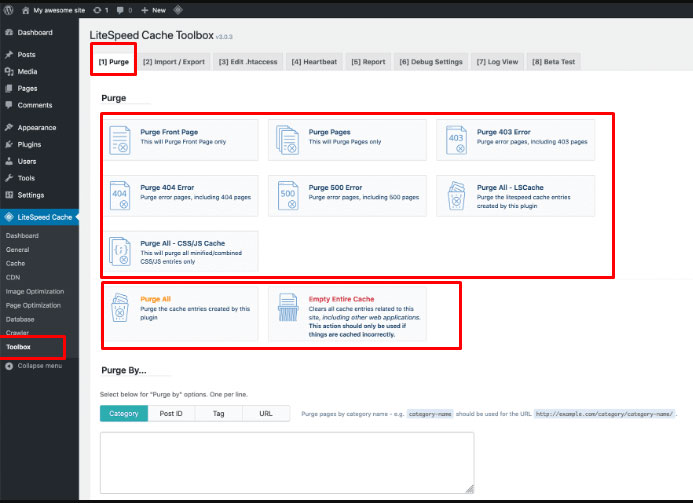
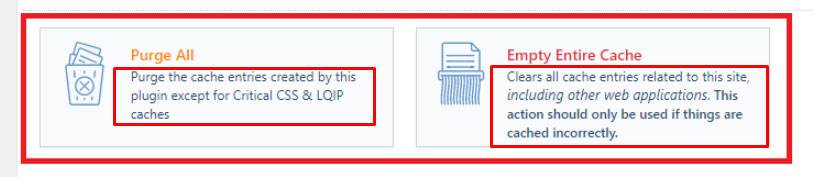
You can head over to the LiteSpeed Cache menu from the left panel and click on “Toolbox”. You will then find an option to “Purge all” or specific pages.
Depending on how much cache you want to clear, you can hit the relevant option, and your cached will be cleared in a few seconds.
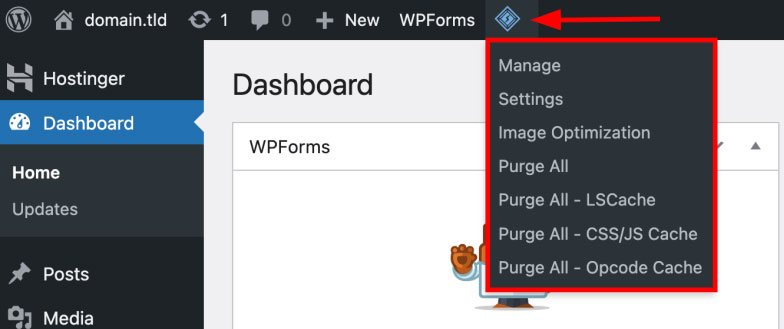
Alternatively, if you want to purge all cache, you can also click on the LiteCache option on the top bar and click on “Purge all”.
Method 2: Clearing Cache Manually via the LiteSpeed Cache Panel
You can also clear the LiteSpeed cache manually from your hosting. Some hosting services give access to the web panel of LiteSpeed Cache. However, that’s not the case with every hosting.
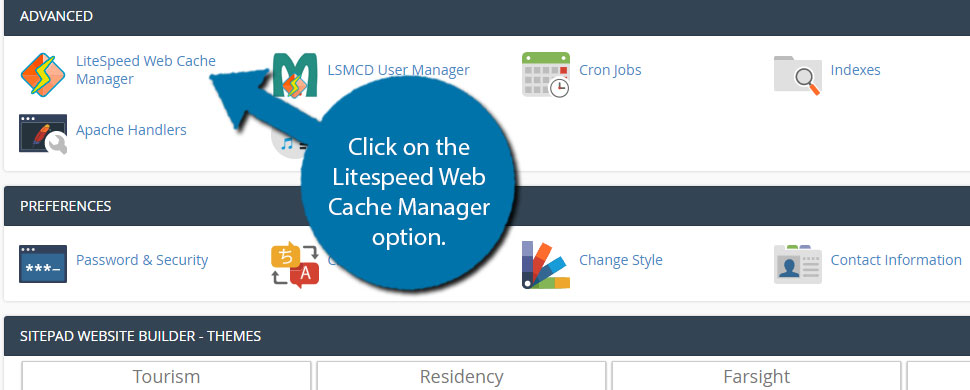
So, if there is a web panel, you can click on the LiteSpeed Web Cache Manager, and then you can flush all the cache from there. Greengeeks provides the web manager; below is a screenshot of the same.
If the hosting provider doesn’t have a web manager, you can manually delete them by heading to the file manager and looking for “LScache”. Delete the data from the folder, and your cache is cleared.
Method 3: Clearing Cache Using LiteSpeed Cache API
Developers love using API. If you are a technical person and know the use of API, you can also use LiteSpeed API to clear the cache.
Here, you can specify the parameters and send the HTTP requests to clear the cache. It also works with WordPress REST API.
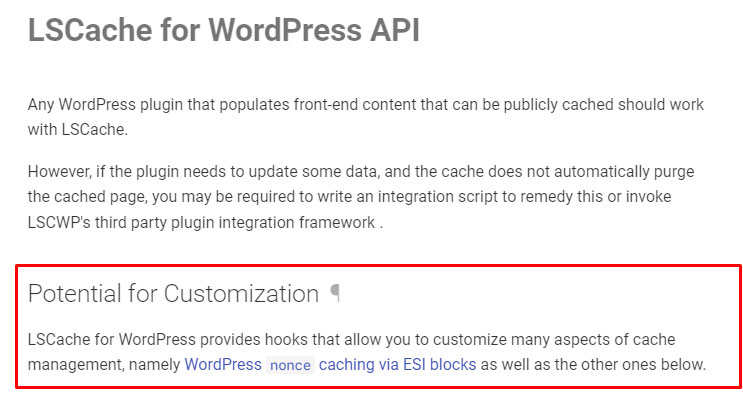
You can check out LiteSpeed documentation to know the parameters and usage of the API. We only recommend using this method if you have worked with APIs before.
Method 4: Clearing Cache via LiteSpeed Cache CLI
You can also use the command line interface to purge the cache. WordPress already gives you a hook for the plugin to purge the cache directly. You can simply type the below code to purge all the cache.
wp lscache-purge all
If you are not using WordPress, you can simply head over to the directory using
“cd path“ (path is the location of the path) where LiteSpeed is available, and then type in the following command:
php cli.php purge
CLI method is difficult if you have not worked with SSH or a terminal before. People usually use a CMS and install the LS plugin. So, let’s see how you can clear it with that.
The next method on “How to clear Litespeed cache,” will discuss using the LiteSpeed cache plugin for additional CMS platforms.
Method 5: Clearing Cache via LiteSpeed Cache Plugins for Other CMS Platforms
All the platforms that offer LiteSpeed cache have easy options to clear the cache memory. LiteSpeed is available on many CMS, including Magento, Joomla, Drupal, etc.
You can simply head to the settings and find the option to clear the cache. It usually has button text like clear cache, flush cache, purge cache, etc.
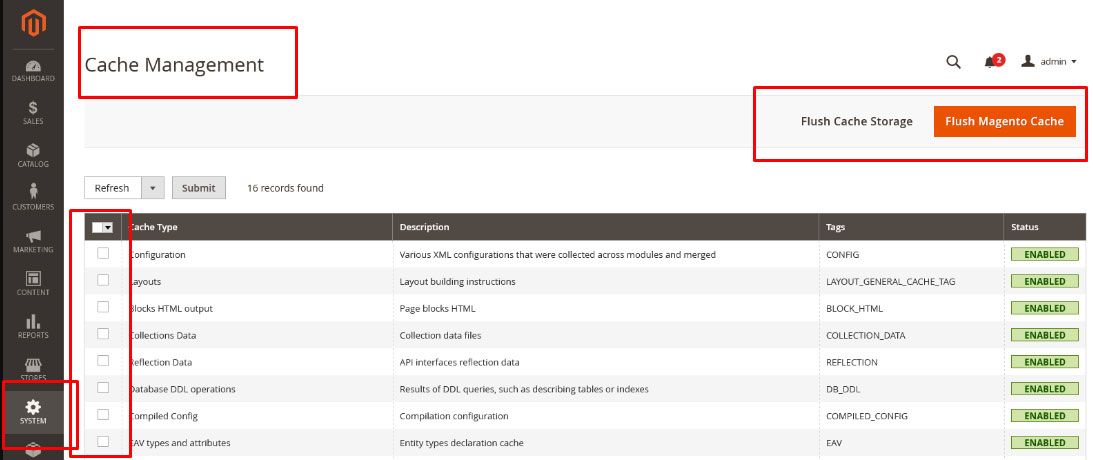
In Magento, you can head over to System, and you will find the cache management option. You can select the type and flush the cache.
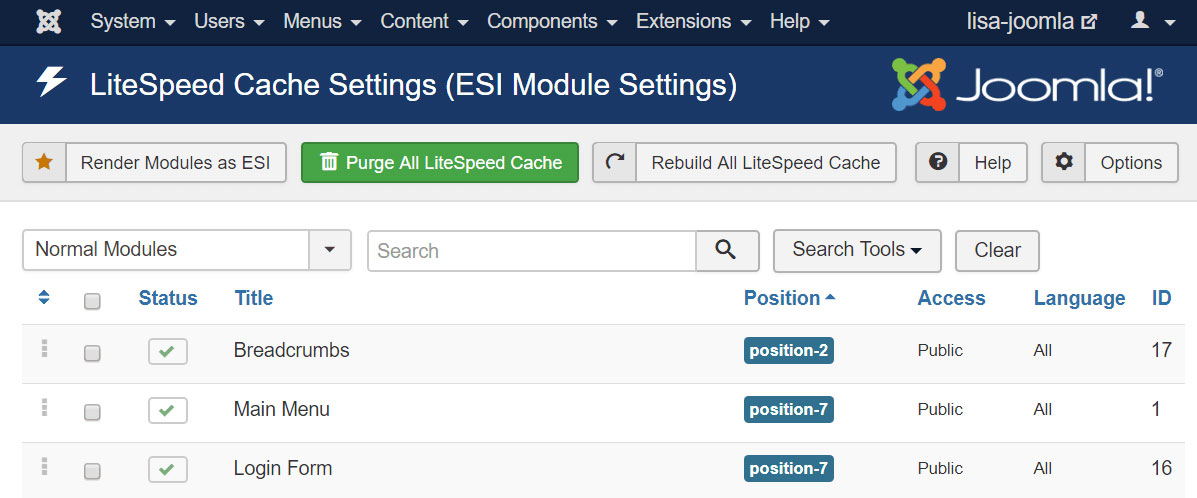
For Joomla, you can head to Components >> LiteSpeed Cache and select the cache you want to purge. After that, you can select Purge all, and you are good to go.
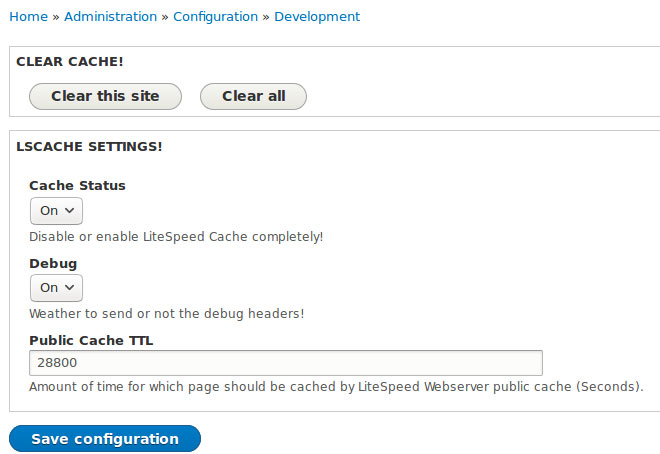
Now coming to the next most popular platform, Drupal. You can head over to Administrator >> Config >> Development. You will find the option to clear the cache.
Method 6: Clearing Cache through LiteSpeed Cache Configuration Files
You can also change the configuration files and clear the cache. It’s an advanced method and should only be used if you are a system administrator or have previously worked with the config files.
- You can look for the config files from your file manager. Alternatively, SSH can also find these files on your server.
- The config files vary depending on the script you are using. The name of the config file name is conf or htaccess.
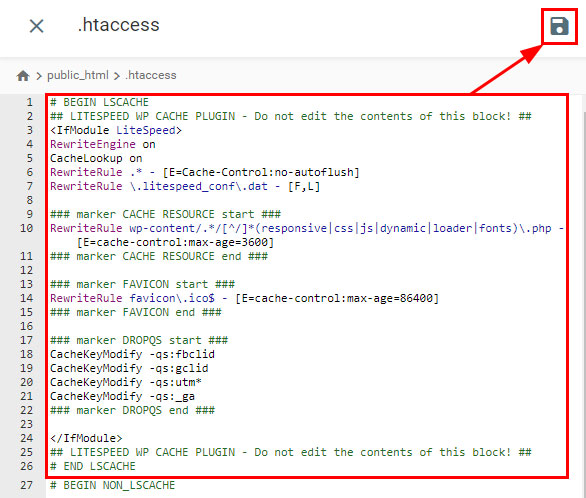
- If you are using WordPress, you will see these config options in htaccess. The file is either on the main directory itself or it can be under “lscache” plugin folder.
- You will get many options to change the details in this config file. You can open the file using a code editor.
- The next step is to look for text such as cache-enable, cache-purge, or expires in the code.
- You can change them to “true” instead of false.
- If you are editing in an htaccess file, you can even delete the entire block of code that starts with “BEGIN LSCACHE” and ends with “END LSCACHE”. Before doing this, make sure you have a backup of the file stored somewhere else on your server.
Method 7: Clearing Cache through LiteSpeed Web Server Configuration
The 7th method is quite similar to the above method. Some people even use the LiteSpeed web server instead of the plugin.
As you might have guessed, you can change the configuration files on the web server. The LiteSpeed web server provides all the options to clear the cache using configuration. However, it’s a bit more complex as compared to the plugin.
The exact location of the files will depend on your installation process and the server you are using. So, we will cover the advanced steps only.
Ensure you have a backup of the config files before making any changes on the server.
So, you can even edit the config files from there.
The file is named httpd.conf or lsws.conf. You can look for one of these files on your web server. After that, you can follow the above steps in method 6.
REMEMBER: Don’t forget to restart the web server for changes to apply.
Best Practices for Clearing Cache
Clearing the cache looks like a small thing. However, you must follow these best practices, as clearing the cache directly affects your website’s performance. The visitors might have a slightly slower loading speed. So, here are the tips for clearing the cache.
- Clearing specific cache elements instead of everything
LiteSpeed or any other caching tech will cache everything. Instead of clearing all these things, you can clear specific cache elements. You can clear specific pages or just clear the image cache. So, the other cache items are stored as it is.
- Clearing cache during off-peak hours
You might crash the site if you make a small mistake during the caching process. So, clearing the cache is recommended when you have fewer visitors. Usually, it’s mid-night time or early morning.
- Monitoring website performance after cache clearing
As mentioned before, the cache is directly dependent on the performance. Therefore, you must monitor your website performance after clearing the cache. If you see significant changes, it’s recommended to recheck the edits you have made.
Troubleshooting Cache Clearing Issues
Sometimes, when you clear the cache memory, it doesn’t get completely clear or you might even get an error. Let’s address them all.
Cache only cleared from server-end
New developers often forget to clear their browser cache so they don’t see new changes on their website. So, the quick solution is to clear the browser cache. You can try opening the website in incognito mode and see if the issue is resolved.
There are also options for browser cache in the LiteSpeed plugin itself.
For the WordPress plugin, you can head over to LiteSpeed Cache → Settings → Advanced and disable browser cache from there. It’s recommended to do it when you are developing the site. This will disable the browser cache.
This way you don’t need to clear the browser cache often.

Conflict with other plugins
You might have enabled multiple caching plugins if you are entirely new to caching. If so, you might have to disable one plugin.
The conflict might even occur with other plugins. Sometimes, other plugins affect the current cache. You can deactivate other plugins and clear the cache again.
Security plugins often conflict with cache plugins. You can try disabling them.
Unexpected Errors due to compatibility issues
If you use the default configuration, you might face issues clearing the cache. Here are a few possible solutions for the same. These settings are in the LiteSpeed menu in WordPress or other CMS.
- You can head to Page Optimization >> JS settings and disable JS Combine External and Inline.
- Click on Cache menu >> Purge and look for Serve Stale. Disable serve stale, and you are good to go.
Permission issues
Permission issues are also a problem. You can reset the permissions and allow LiteSpeed to read/write in directories. The directories permission is 755, and that of files is 644.
You can use the following code to change the permissions:
find /path/to/cache_directory -type d -exec chmod 755 {} \;
find /path/to/cache_directory -type f -exec chmod 644 {} \;
Here, you can replace the path with your cache directory. It depends on the script/code you are using. If you are using CMS, you don’t need to worry about it, as permissions issues don’t usually arrive there.
Conclusion
The best way to clear the cache is to look for the “Purge all” or “Clear cache” option in the plugin menu.
It’s important to clear the cache regularly as it allows visitors to see your website’s latest updates, and it even helps you in development.
When you are clearing the cache, don’t forget to follow the best practices to avoid any conflicts.